
The stylus is the only part of the entire system that actually touches the record. Whether the turntable's speed is stable, whether the tonearm's geometry is correct, and whether the phono stage's gain is sufficient are merely prerequisites for sending out a signal; the only thing that truly performs mechanical motion in the groove and reads vibrations as sound is the stylus tip. It determines what you hear, and also determines how the record surface is treated.
The short answer: most styli need replacing after roughly 300 to 1000 hours of play, depending on the model, so go by your stylus manufacturer's rating (Audio-Technica suggests about 300 hours; Ortofon says up to 1000 hours with proper care). At five hours of listening a week, that works out to somewhere between a little over a year and about four years.
The trouble is that stylus wear is gradual. It does not suddenly fail on a certain day, but over several months slowly makes the highs darker and inner-groove distortion heavier. Most people first realize it is time to replace the stylus because even a record that was previously in good condition no longer plays well.
This guide provides an order of judgment: first rule out setup issues, then rule out cleaning issues, and only finally determine lifespan. The order cannot be reversed, because distortion caused by misalignment and distortion caused by wear sound very similar, and replacing a stylus that was still good will neither solve the alignment problem nor leave you with a usable reference.
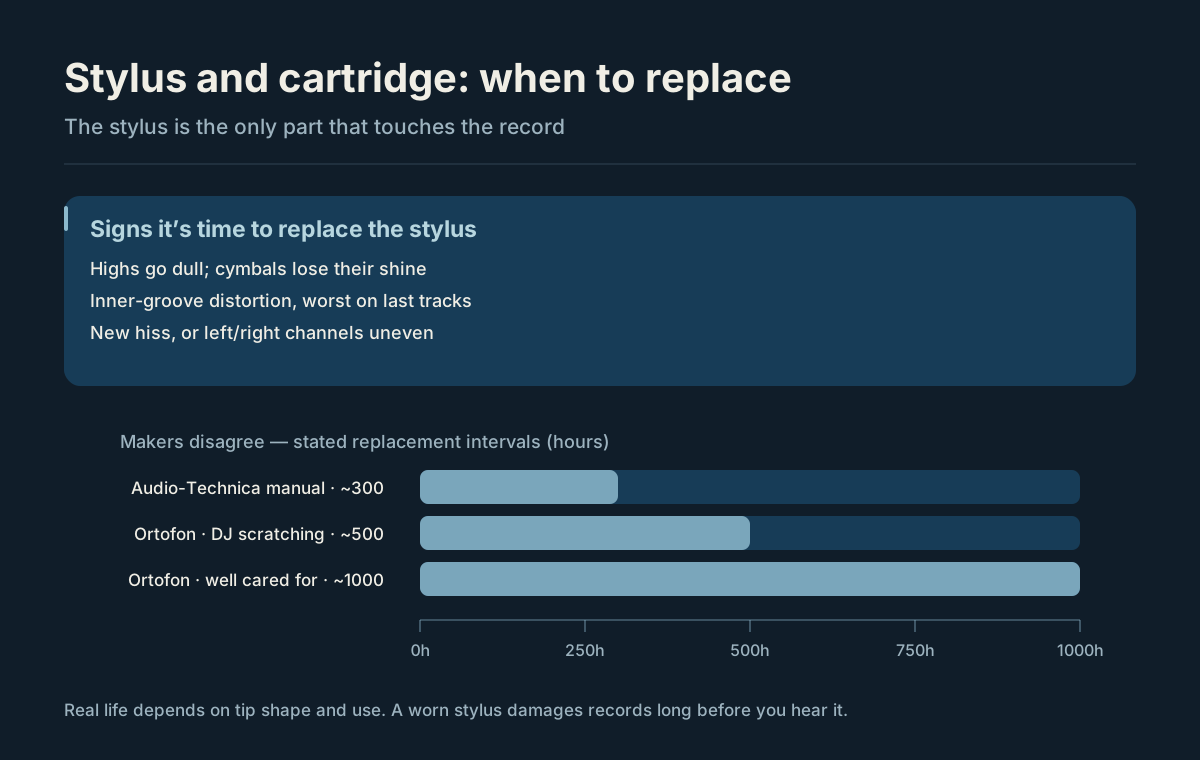
Illustration: Manufacturer recommendations vary widely, from about 300 hours to over 1000 hours.
Key Points at a Glance
- The stylus is a consumable, but manufacturer-rated lifespans vary greatly: Audio-Technica's manual recommends about 300 hours, while Ortofon claims up to 1000 hours with proper care (about 500 hours for DJ scratching use). Estimate according to the specific model's manufacturer instructions and actual playback conditions, not by year of purchase.
- Darkened highs, inner-groove distortion, and left-right channel imbalance are typical signals, but they can also come from tracking force, anti-skate, the phono stage, or the record itself, and must be ruled out item by item.
- The cleaning order is dry brush first, then wet cleaning if necessary; do not blow with your mouth, do not touch the stylus tip with your fingers, and do not use solvents of unknown origin instead of dedicated cleaning fluid.
- Before deciding to replace, do two things first: recalibrate tracking force and anti-skate within the manufacturer's recommended range, and re-listen to the inner grooves with a record you are confident is in good condition.
- If the cartridge itself is not broken, replace only the stylus first; when the cartridge is discontinued, compatible styli are hard to find, or it was an entry-level model to begin with, replacing the entire cartridge is often more practical.
Why the Stylus Wears
The contact area between the stylus tip and the groove is extremely small, and the tracking force concentrates the weight of the tonearm and cartridge onto such a point. The groove walls therefore endure very high pressure over the long term, and each playback leaves some irreversible change on both the stylus tip and the vinyl surface. This is the essence of wear: it is not that a part suddenly breaks, but that both surfaces change a little after countless instances of friction.
It is easier to understand when magnified: the stylus tip advances along a spiral, the left and right groove walls carry the modulation of the two channels respectively, and the stylus tip must simultaneously fit both wall surfaces while also keeping up with the fastest transients. Any factor that prevents the stylus tip from fitting stably concentrates pressure onto a smaller area, and wear accelerates accordingly.
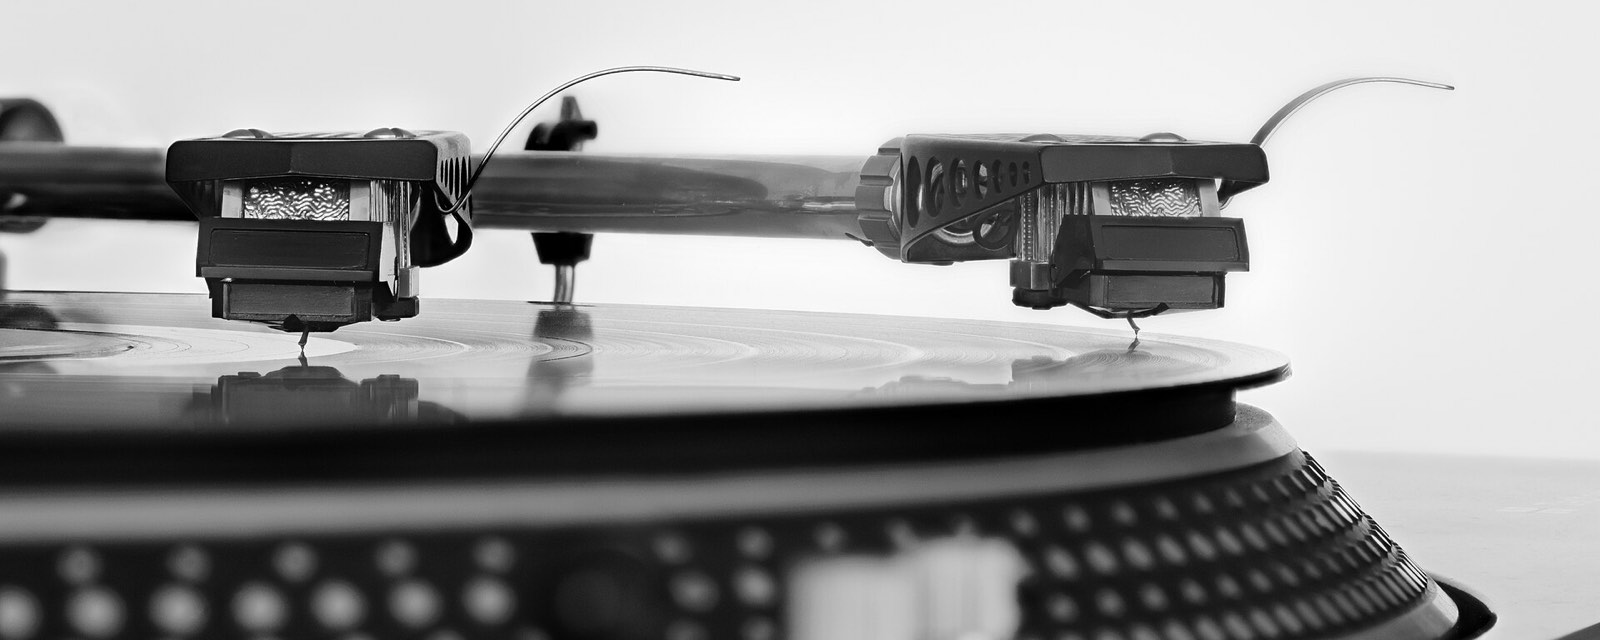
The stylus bears great pressure over an extremely small contact area, and every playback is one instance of wear.
The main factors that actually accelerate wear are these:
- Dust and debris on the record. They become trapped between the stylus tip and the groove, acting as an abrasive. This is also why cleaning records and maintaining the stylus are really two sides of the same thing.
- Tracking force outside the manufacturer's recommended range. Too low lets the stylus tip briefly leave the wall at transients, producing impact; too high directly presses more pressure onto the groove. Both directions accelerate wear, and they do not cancel each other out.
- Improper anti-skate setting. The purpose of anti-skate is to counteract the tonearm's tendency to slide inward. If set incorrectly, the stylus tip will press against one side of the groove over the long term, causing uneven wear between the left and right channels.
- Deviation in tracking angle and azimuth. They make the stylus tip's contact surface no longer parallel to the groove walls, which amounts to scraping with one edge.
- Differences in stylus tip shape. Conical styli have a larger contact area and are usually more durable; shapes such as elliptical, line contact, and Shibata fit the groove more closely and retrieve more detail, while also being more sensitive to angle. Lifespan cannot be judged by shape alone; manufacturing precision and polishing quality also matter.
- The condition of the record itself. Records that are already worn or heavily scratched will consume the stylus faster; this is a mutually damaging relationship.
How to Estimate How Much Life You Have Left
The numbers given by manufacturers vary greatly, and it is not a precise countdown. To turn it into a judgment useful to you, you need two things: the playback duration of one record, and the number of times you actually play records.
One side of a 12-inch LP is usually around twenty minutes, and listening to both sides takes about forty minutes; if you are in the habit of listening to both sides each time, then after listening to just over twenty records you accumulate more than ten hours. Multiply this number by your listening frequency to get a rough cumulative amount, then plan according to the lower end of the range, which is more conservative and safer.
- Treat the lower end of the range as a reference line, not an upper limit. Start paying attention to changes in sound at seven or eight hundred hours.
- Treat cartridges of unknown origin as near the end of their life. A cartridge that came with a secondhand turntable, has a stylus of unknown origin, or belonged to a previous owner with unknown habits should all be treated as needing replacement first.
- Start the clock over after replacement. Stylus life is not inherited; a new stylus is a new starting point.
- Write down the cartridge model, replacement date, and cumulative hours. Paper and pen or a tracking tool both work; if you are already using CRATTO to manage your collection, it will be easier to keep equipment and maintenance records in the same system, see the approach in Managing Your Vinyl Record Collection with CRATTO.
Hours are only one dimension of wear. How clean your records are and how precisely your system is calibrated both change the actual rate: a stylus that has run eight hundred hours on clean records in a well-calibrated system is very likely in better condition than one that has run four hundred hours on dirty records with too-high tracking force.
Audible and Visual Signs of Wear
Changes in sound usually appear in the following order, though systems are not entirely consistent:
- High frequencies become dull. Cymbals lose their sheen, strings have fewer overtones, and everything sounds like it has a thin veil over it.
- Sibilance and inner-groove distortion worsen. Vocal sibilance starts to sound fuzzy, and it becomes more obvious in the last two or three tracks closer to the label. The inner groove is the hardest place to track because the same revolution has to read a shorter length of groove with denser modulation.
- Left-right channel imbalance or narrowed imaging. This usually points to anti-skate or azimuth, and can also come from uneven stylus wear.
- New hiss or pops that were not there before. This needs to be distinguished from damage to the record itself.
- Dynamics become compressed. You need to turn the volume higher to hear details, yet loud passages are no longer effortless.
Visual inspection is also useful, but it requires tools and a bit of patience:
- Use a jeweler's loupe or small microscope with enough magnification to examine the stylus tip, focusing on whether there are obvious flat worn facets, clumps of attached material, and whether the cantilever is skewed.
- Let the stylus move slowly under strong side light and observe the shape of the reflection on the tip. A worn-flat stylus tip reflects light differently from a new one.
- Check the relative position of the cantilever and the cartridge body. A cantilever that has been pushed sideways may already be offset, and calibration alone cannot bring it back.
- Observe the suspension damping inside the cartridge. Rubber parts harden with age, and even with little playing time the suspension may already have lost its elasticity.
Whether by listening or looking, do not skip the process of elimination: try a record known to be good as a comparison, check the phono input and cables, and confirm the turntable is level. Only after ruling out these variables should you conclude that the stylus is the issue.
Cleaning the Stylus: Dry Brushing and Wet Cleaning
Stylus cleaning has only one goal: remove the dust and dirt attached to the tip, while applying no lateral force to the cantilever.
Dry brushing is the daily method:
- Use a dedicated stylus brush, brushing gently from back to front along the direction of the cantilever, letting the bristles sweep across the tip rather than pulling sideways.
- Brushing once after each record is the easiest. Waiting until dirt builds into hard clumps makes it much harder to deal with.
- The brush itself must be clean. If dust builds up on the bristles, you are just wiping dust back onto the tip.
Wet cleaning is for material that dry brushing cannot remove:
- Use a commercially available stylus cleaning fluid, or use cleaning gel. Cleaning gel is used by pressing down and then pulling up, relying on its tackiness to lift material off the tip.
- When using cleaning fluid, let the brush pick up a small amount, still sweep gently along the cantilever, and do not spread liquid all over the cartridge.
- After cleaning, let the tip dry naturally before putting it back on a record. A tip with liquid on it will attract new dust.
- Wet cleaning does not need to be frequent; daily dry brushing with an occasional wet clean is more reliable.
A few clear don'ts:
- Do not blow on it with your mouth. Saliva and moisture bring new dirt, and you cannot control the force.
- Do not touch the tip with your fingers or any hard object. Even a light touch can change the position of the cantilever.
- Do not brush with lateral force. This is the action most likely to bend the cantilever.
- Do not use solvents of unknown origin instead of dedicated cleaning fluid. Some adhesives and damping materials are sensitive to solvents, and liquids with unknown formulations carry uncontrollable risk.
Do Not Ignore These Settings: Tracking Force, Anti-Skate, and Tracking Angle
Half of a stylus's performance depends on setup. Each of the following is worth rechecking after changing the cartridge, changing the tonearm, or even changing a phono mat of a different thickness:
- Tracking force: Exceeding the manufacturer's recommended range accelerates wear on both the record and the stylus. Too low is no safer than too high; it causes skipping and transient shocks. Measure with a separate tracking force gauge, and do not rely only on the scale on the tonearm.
- Anti-skate: Generally matched to tracking force. Too much makes the tip pull to one side, causing one-sided wear; too little tends to produce distortion in the right channel.
- Tonearm height and tracking angle: This determines the attitude of the stylus tip as it enters the groove, affects high-frequency performance, and also affects which part of the groove wears.
- Azimuth: Tilting the cartridge left or right causes asymmetric wear on the two groove walls and disrupts channel balance.
- Overhang and effective length: Installation position errors create tracking error around the whole record, and this kind of distortion is often most obvious in the inner grooves.
- Mounting tightness: Screws that are too loose let the cartridge move under vibration, while screws that are too tight can deform the cartridge body under stress.
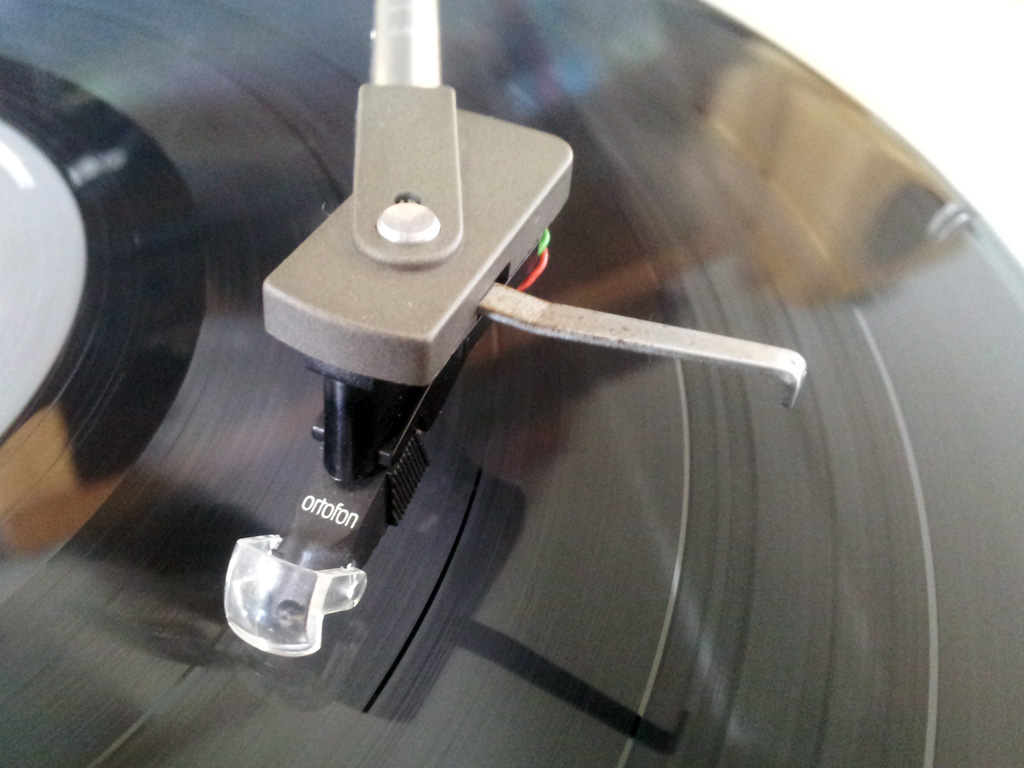
After changing the cartridge or tonearm, tracking force, anti-skate, and tracking angle must all be recalibrated.
These settings don't need frequent adjustment, but every time you touch the cartridge, you must recalibrate them. It's also worth fixing the order: first confirm the turntable is level and the speed is correct, then mount the cartridge, adjust overhang and azimuth, then set the tracking force, and finally set anti-skate based on the tracking force. If the order is mixed up, earlier adjustments will be undone by later actions.
Cartridge Lifespan and Upgrade Decisions
A stylus and a cartridge are not the same thing. The stylus is the component with the tip, while the cartridge is the transducer that converts mechanical vibrations into electrical signals. To decide what to replace, first distinguish which structure you're dealing with:
- Moving magnet (MM) and moving iron (MI) cartridges usually have replaceable stylus assemblies. When the cartridge body is undamaged, replacing the stylus is the most direct option.
- Moving coil (MC) cartridges have lower output, and many models' styli cannot be replaced by the user; they require professional retipping or complete replacement.
- All-in-one designs on low-cost cartridges often make the stylus and body a single unit, so replacing the stylus and replacing the cartridge are the same thing.
Besides playing time, there are two easily overlooked dimensions:
- Aging of the damping rubber. The rubber parts suspending the cantilever harden over time; even with few playing hours, the sound can become tight and tracking ability can decrease.
- Physical damage to the stylus tip. A single accidental collision can chip the tip or misalign the cantilever, regardless of cumulative playing time.
Before upgrading, first confirm that other links in the chain won't become bottlenecks. Moving coil cartridges require a phono stage that supports MC or a step-up transformer, while moving magnet cartridges are more sensitive to capacitive loading. The signal from the cartridge must undergo RIAA equalization during amplification; the accuracy of that equalization directly determines whether the frequency response is correct. For the background of this curve, see the introduction to RIAA equalization. If the phono stage's input matching is already wrong, changing to a more expensive cartridge will only amplify the problem.
A practical rule: if the replacement stylus you need is easy to buy and comes from a reliable source, replace the stylus first; if the cartridge is discontinued, compatible styli come from unknown sources, or you already want to move up a tier, put your budget toward a complete cartridge. Third-party replacement styli vary greatly in specification, so when purchasing, confirm the cartridge model and stylus shape they correspond to.
Stylus Condition and Record Condition Are Two Different Things
There are two kinds of wear in a system: that of the stylus and that of the records. Their sonic symptoms often overlap and need to be assessed separately.
An old record in average condition will naturally sound dull in the highs, and the inner grooves may distort due to the previous owner's playback history. If you misjudge this distortion as stylus wear, you'll keep replacing styli; conversely, if you misjudge record damage as a stylus problem, you may continue playing more records with an already worn stylus.
The method is straightforward: change to a record you know is in good condition and listen only to two or three tracks on the inner grooves. If the distortion remains, the problem is the stylus or setup; if only that old record has issues, it's back to the record itself. For record condition grading, see the Vinyl Condition Grading Guide.
To understand the relationship between grooves, stylus tip, and vibration, see How Vinyl Works and Four Types of Listeners. Secondhand collections vary widely in record condition, which is why many people are willing to spend time selecting—see Why I Listen to Secondhand Vinyl for the mindset involved.
Frequently Asked Questions
Does a stylus age even if not used often
Yes. Besides playing wear, the rubber damping parts suspending the cantilever harden with age. If a cartridge has been unused for a long time, before restarting it's best to check the suspension and sound performance.
Can cleaning gel damage the stylus
Used as directed, no. Cleaning gel relies on tackiness to lift debris; the force is vertical. What's truly dangerous is pushing or pulling the cantilever sideways. Keep the cartridge stable on the tonearm during use, press down and lift straight up.
Is skipping always a stylus problem
Not necessarily. Common causes also include debris on the record, too-low tracking force, improper anti-skate setting, unlevel turntable, warped records, and physical damage to the grooves themselves. Clean the record first, then check settings, and suspect the stylus last.
Is it normal for the sound to become brighter after a new stylus
Usually yes. A new stylus tip has a complete shape and better groove contact, so highs are naturally clearer. If you find it harsh, first confirm tracking force and anti-skate are within recommended ranges, then give the new stylus some break-in time and system settling.
How do I know if a third-party replacement stylus is usable
First confirm it explicitly corresponds to your cartridge model, then check that the stylus shape and manufacturer-recommended tracking range match. After installation, recalibrate tracking force and anti-skate, and audition the inner grooves with familiar records; if distortion or channel imbalance appears that wasn't present with the original stylus, stop using it.
Manage the Stylus as a Consumable
The stylus is one of the few components in this system that wears steadily and needs periodic replacement. Rather than waiting until a record sounds wrong to suspect it, incorporate it into your routine: brush it after each listening session, periodically verify tracking force and anti-skate, and schedule replacement based on cumulative playing time.
Records are also consumables, just consumed much more slowly. Handle the relationship between the two well, and you can use a stylus in good condition to get a longer, more complete life out of your records.
Image Credits
The photos in this article are from Wikimedia Commons, used under the licenses indicated for each image; diagrams are by CRATTO.
- The stylus bears great pressure over a very small contact area, and every playback is a round of wear: Franz van Duns · CC BY-SA 4.0 · Source
- After changing the cartridge or the tonearm, tracking force, anti-skate, and tracking angle must all be recalibrated: Jacques from Cape Town, South Africa · CC BY 2.0 · Source

