
The most common damage to vinyl records doesn't happen on the turntable—it happens on the road. Every throw during handling, sorting, and in the delivery truck pushes the weight of the box toward the weakest corners; a 180-gram record plus its cover is not light, and if there's any gap inside the box, it will cut through the cover before it even arrives. So the goal of packing is simple: keep the impact from reaching the record itself.
Conversely, if the package arrives with corner dings, seam splits, or cracked edges, the cause is usually not "bad luck" but one of three things: not enough cushioning layers, the record not being separated from the cover, or the wrong box size. Solve these three things one by one, and most shipping damage can be prevented in advance.
This guide follows the actual packing order: first separate the record from the cover, then add cushioning, then choose a box, secure multiple records, write markings, keep evidence, and finally inspect upon receipt and file insurance claims. Each step includes criteria so you can follow along directly.
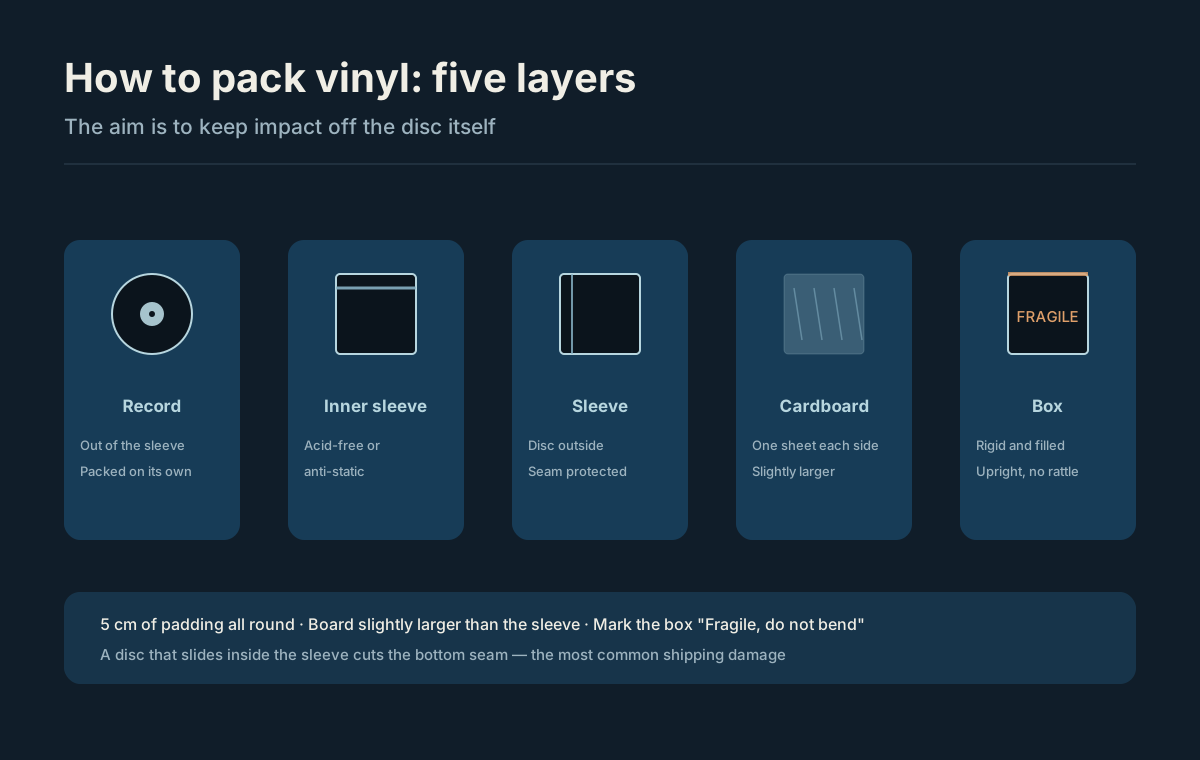
Illustration: Leave about 5 cm of cushioning on all sides; the cardboard should be slightly larger than the cover.
Quick Overview
- The record must be removed from the cover, placed outside or behind the cover, and then both put into an outer sleeve.
- Leave about 5 cm of cushioning on all sides (most carriers recommend 2 inches per side as a packaging rule of thumb), with two layers of corrugated cardboard sandwiching the cover.
- Prefer dedicated record shipping boxes; if none are available, choose a rigid box slightly larger than the record, and fill all sides so there's no room to shift.
- Stand multiple records upright, do not stack them flat; fill any space where they could slide side to side.
- Write "Fragile, Do Not Bend" on the outside, and photograph the packing process and the finished package before shipping.
- When unpacking, open a small flap at the corner first to make sure the blade doesn't touch the record; check the record for warping as soon as you take it out.
Where Damage Usually Happens
Packages on the sorting line get thrown, crushed, and stacked, and during the final delivery they may be squeezed into a vehicle. The record itself is hard, but once it can move inside the box, it will repeatedly hit the walls, concentrating force on the cover's corners and bottom seam.
The three common types of damage have different causes:
- Seam split: The record slides inside the cover and cuts through the bottom edge or spine like a knife. This is the most frequently mentioned and easiest to prevent.
- Corner ding / crease: External force directly hits the cover's corner; if the cardboard isn't larger than the cover, the corner takes the force first.
- Warping and scratches: The box is exposed to heat and pressure, or the record rubs against hard edges inside the box.
There's another type of damage that isn't a packing issue: the record was already warped during pressing or storage. Upon receipt, this type of problem looks different from shipping damage; see the inspection method later.
The criterion is simple: push the packed box with your hand. If the contents can move, it's not packed yet.
Step 1: Remove the Record from the Cover
This is the highest-value step in the whole process, and also the most often overlooked. If the record stays inside the cover, vibrations during shipping will make it slide back and forth inside the paper sleeve, and a journey of just a few dozen kilometers is enough to cut through the bottom edge or spine, creating a so-called "seam split."
The correct approach is:
- Take the record out, place it behind or outside the cover, and then put both into an outer sleeve or outer cover.
- If the record is valuable, first wrap it separately in an acid-free paper inner sleeve or anti-static inner sleeve, then place it next to the cover.
- Point the inner sleeve opening upward or opposite to the cover opening to reduce the chance of the record sliding out.
- Printed inner sleeves themselves can leave friction marks on the record surface. For long-distance shipping, it's best to transfer the record to an acid-free inner sleeve and pack the original inner sleeve flat alongside.
For choosing inner sleeve material, the criteria can be simplified to three points: acid-free, anti-static, and whether the sleeve itself sheds particles. If you're dealing with a batch of records at once, a quick condition check will make it easier to decide which ones deserve an extra layer. The Vinyl Condition Grading Guide has complete grading criteria; for jotting down condition before batch packing, see Collection Organization Practices.
One thing to note: moving the record outside the cover means the first thing seen upon opening the package is the bare record surface, so the outer protective layer should be cleaner and more form-fitting—don't let the record surface directly touch the rough side of corrugated cardboard.
Step 2: Leave Enough Cushioning Thickness
The purpose of cushioning is not to "pad softly" but to create a compressible distance between the record and the box wall. Leave at least 5 cm of cushioning material around the record—bubble wrap, corrugated cardboard, or foam board all work, but it must surround all sides, not just top and bottom.
Sandwiching the record between two layers of corrugated cardboard is the easiest and most effective method:
- The cardboard should be slightly larger than the cover so impact lands on the cardboard, not the cover corners.
- Alternate the direction of the cardboard's corrugation for better bending resistance.
- Don't put hard materials between the cardboard and the record—hard against hard transmits force directly.
- Add an extra piece of small cardboard or bubble wrap at the corners, the most vulnerable spots.
Wrap bubble wrap all the way around, not just the front and back. If you use only a thin layer of bubble wrap, it will have no margin left once compressed. The criterion: press hard on the packed cushioning with your palm—it should compress a little and spring back when released, not bottom out.
Step 3: Choosing the Box
The box's job is to disperse impact, not to withstand it rigidly. A box that's too thin will collapse, and one that's too large will let the record accelerate inside.
- Dedicated record shipping boxes are the safest: the size fits just right, the box walls are strong enough, they usually come with cardboard reinforcement, and there are corresponding specs for multiple records.
- When you don't have a dedicated box: choose a rigid cardboard box a size larger than the record and fill all around with cushioning material until nothing moves.
- Avoid soft courier bags: they don't protect any corners, the record can move freely inside the bag, and it's one of the most problematic types of packaging.
- Avoid using an oversized box: the larger the empty space, the greater the acceleration the record gets in transit, and the greater the energy when it hits the box wall.
Packaging tape should be applied in an H shape or I shape, covering the center seam on the top and bottom and both long edges. A box with only one center seam taped is very likely to split from the corners during handling.
Humidity and temperature also need to be considered. The strength of cardboard drops noticeably after it absorbs moisture. For long-distance shipping or shipping during the rainy season, you can add a layer of plastic film inside the box as a moisture barrier, but be careful not to wrap the record so tightly that the film is completely airtight—sealed plastic tends to form condensation when temperatures change, which instead leaves moisture near the record surface. A more reliable order is: protect the record first with an inner sleeve and outer sleeve, put the cushioning layer outside, and place the moisture barrier outside the cushioning layer, close to the box wall.
Extreme temperatures are also worth noting. In summer, inside a carriage parked outdoors for a long time, the temperature inside the box rises noticeably, and vinyl is more likely to deform under heat and pressure, so try not to let the package sit in transit for a long time, and keep an eye on tracking updates after sending.

The principle for packing is the same as for shelving: stand upright, fill the space, and don't let records press against each other.
How to Pack Multiple Records
When shipping in bulk, the weight itself is a risk. The greater the total weight inside the box, the greater the impact at the moment it lands, so securing is more important than cushioning.
- Stand upright, don't stack flat: stacking flat concentrates the weight on the surface of the bottom record, and long-term pressure and vibration can easily cause warping; when standing upright, the force is shared by the sleeve and cardboard.
- Leave no room to shift: fill tightly between records and between records and the box wall, using cardboard dividers or bubble wrap as separators.
- Distribute the weight: spread multiple records across the bottom of the box as much as possible; don't concentrate them into one block that can topple.
- Pack separately: if you need to send many records at once, it's better to split them into two boxes. The smaller and stiffer the box, the less likely it is to be crushed.
- Don't use rubber bands to bundle records: long-term pressure can leave marks on the sleeve and may also crush the edge of the record.
A practical test: after packing, lift the box and tilt it gently left and right; only if you don't hear anything sliding inside is it acceptable.
If a batch contains both expensive and cheap records, don't cram the expensive and cheap ones into the same box just to save on shipping. Once something goes wrong inside the box, the loss is calculated based on the most expensive one, and the shipping saved is far from enough to make up for it. Likewise, when sending to different buyers, keep them separate too, and avoid repacking inside the box—repacking often means another layer of space where things can slide.
If you're managing a batch of records at the same time, updating your records before shipping will save a lot of trouble: which ones have been sold, which are still on the shelf, and which are in transit. Once written clearly, when you look back months later it won't fail to match up. This is where the value of using CRATTO to manage your collection lies—not for appearance, but so that the question "where is it?" always has an answer.
Marking, Declaration, and Insurance
Write "Fragile, Do Not Bend or Crush" on the outside of the box. This isn't a cure-all, but it costs nothing and lets the people sorting and delivering know what's inside.
For cross-border shipments, declare the value truthfully. Under-declaring may save a little tax now, but if it's lost or damaged, compensation will be calculated based on the declared value, and you'll have to bear the difference yourself. For high-value records, consider purchasing shipping insurance and keep the transaction records or valuation basis on file.
Before sending, remember to:
- Photograph the entire packing process, especially the three key points: taking out the record, laying the cushioning, and finishing sealing the box.
- Photograph the marks on the outside of the box and the courier label.
- Keep condition photos, preferably showing the original state of the record surface and sleeve.
If a dispute arises, these photos are far more useful than explanations afterward. If you need to describe condition in words, it's best to follow common grading terminology, stating clearly "which side, which location, what degree," which is much more effective than saying "a bit old." Discogs' grading guide is a public standard you can refer to.
How to Open a Package After Receiving It
Opening the package is the most easily overlooked step, and many scratches are actually caused by the recipient.
- Don't cut all the way through with a knife. First make a small opening at the corner, confirm the blade isn't touching the record, then slowly enlarge it.
- After taking out the record, first check whether it's warped. Place the record on a flat surface and observe whether the edge sits flush, or stand it up and look from the side.
- For slight warping, you can first place it on a flat surface, press it with a heavy object, and let it sit to observe; don't rush to play it.
- If it's clearly warped, don't force playback; first confirm whether it affects tracking, and if necessary cross-check with another system.
Distinguishing noise from damage is equally important: if what you hear is a burst of noise concentrated in certain sections, it's more likely a scratch or pressing defect rather than dust. With this kind of problem, don't jump to conclusions; first rule out tracking and stylus condition, then decide whether the record surface needs treatment.
A more reliable approach is: first confirm the type and location of the noise, then decide whether to clean it, replace the inner sleeve, or honestly record it as part of the record's condition. Shipping damage and pre-existing wear are handled completely differently. If you distinguish between the two on the day you receive it, later communication will go much more smoothly.
Common Questions
The seller shipped it in a courier bag, and the sleeve has a bent corner. Can it be saved?
A bent corner means the paper fibers have been crushed and creased, and it basically cannot be fully restored. You can put it in an outer sleeve to protect it and prevent further deterioration, and record it as part of the condition. If the record itself is important, consider finding another copy with a intact sleeve to replace it.
If the record is taken out of the sleeve, will it be more likely to get scratched?
The premise is that there is still a clean inner or outer sleeve on the outside. A bare record surface directly against corrugated cardboard is indeed risky, so wrap it in an acid-free inner sleeve or anti-static bag, then place it between two layers of cardboard. The damage caused by seam splits is usually more serious than this.
Do I have to use a dedicated record box?
Not necessarily, but it is the least worrisome option. The dimensions and wall thickness of a dedicated box are designed for records, and it usually comes with cardboard reinforcement; if there is still empty space inside the box, it still needs to be filled. When using an ordinary cardboard box, be sure the cardboard is slightly larger than the sleeve, fill all around, and place it upright.
Is shipping insurance worth buying?
It depends on the value of the record and whether it can be replaced. If this record is hard to find again, or its value is clearly higher than the shipping cost and insurance premium, then the meaning of insurance is clearer. Before buying, confirm the coverage limit, deductible conditions, and the evidence required for a claim, especially condition photos and packing photos.
How soon after receiving the package should I inspect it?
The sooner the better. Most carriers have time limits for damage claims, and sleeve creases and seam splits are often clearly visible shortly after opening the box. It is recommended to complete the inspection and take photos on the day you unpack, and also record the unboxing process.
Final Thoughts
Packing is not a test of patience, but a process that can be fixed. Separate the record from the sleeve, leave enough cushioning on all sides, choose the right box, leave no empty space inside the box, declare honestly, and keep photos—do these six things in order, and the vast majority of shipping damage can be avoided. What really determines success is not how much material you use, but whether you have addressed every small spot where the record could move or bear force.
Image Credits
The photos in this article are from Wikimedia Commons and are used under the licenses indicated for each image; the diagrams were made by CRATTO.
- The principles of packing are the same as shelving: stand upright, fill completely, and do not let records press against each other: Dusty Groove · CC BY-SA 3.0 · Source
